Seaweed Developer / Caffenol / Homemade Camera
Developing film with Seaweed
When I started shooting large format I quickly discovered that getting the film developed wasn’t going to be as simple as sending it off to a local lab. Many labs don’t even offer the service and when they do it’s fantastically expensive.
Developing black and white film yourself is relatively simple and after some quick research I discovered that many things can be used as a substitute for developer. And thus began my foray into alternative darkroom chemistry.
There are many many recipes for developer concoctions and seeing as I was shooting the coastal Cornish landscape, utilising an abundant resource like seaweed seemed like a logical first step.
I found a recipe developed by Melanie King of The Sustainable Darkroom.
Bladderwrack is the seaweed to use, and can be easily found clinging to rocks at low tide. Due to the potential of pollution, it’s best to harvest live seaweed, rather than that which has washed up on the shore. Only harvest what you need and don’t collect it all from one plant. Trimming only half the thallus will ensure the seaweed will continue to grow.

You will also need some vitamin C powder, this combined with the seaweed soup (we’ll get to that) helps to increase the potency of the developer.
Finally, sodium carbonate. Depending where you are in the world this can be referred to as washing soda, soda ash, or soda crystals. This final ingredient is used as pH modifier.
The recipe: Rinse 150g of fresh seaweed in fresh water, pour 500ml of boiling water over the seaweed and let it stew overnight.
You want your developer to be around 30 degrees so use a hot water bain-marie to heat 150ml of your drained seaweed soup. In a separate container dissolve 50g of sodium carbonate in 150ml of water. When fully dissolved add 15g of vitamin C powder.
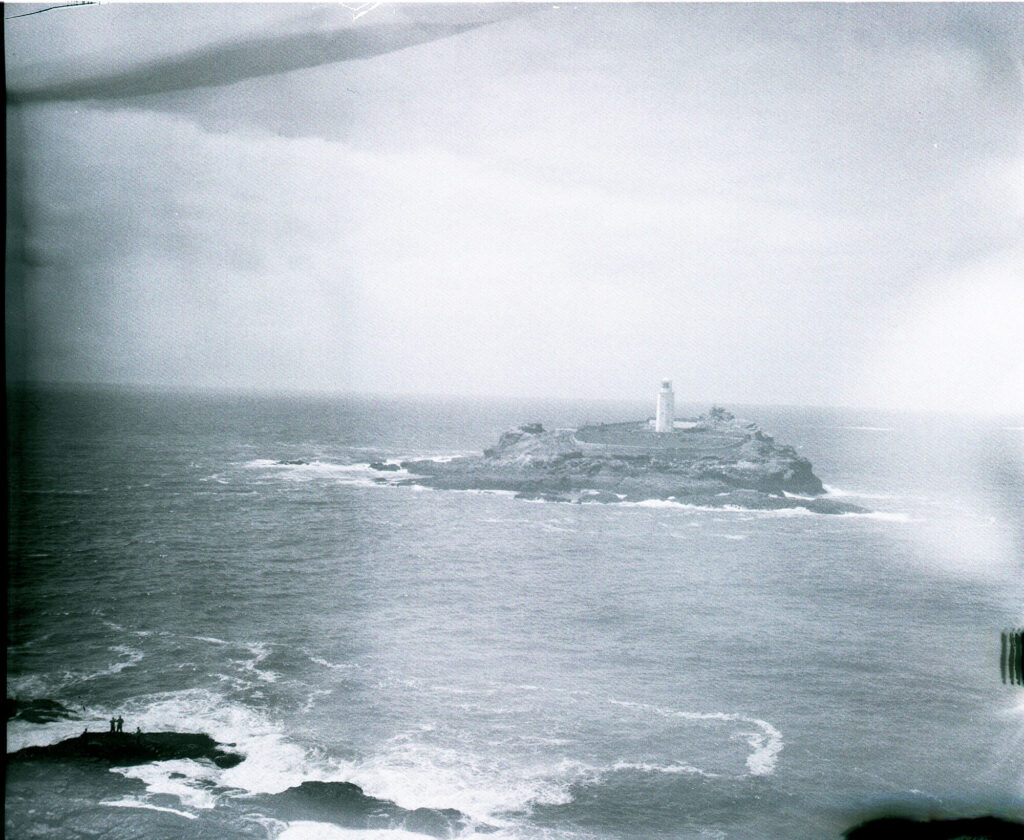
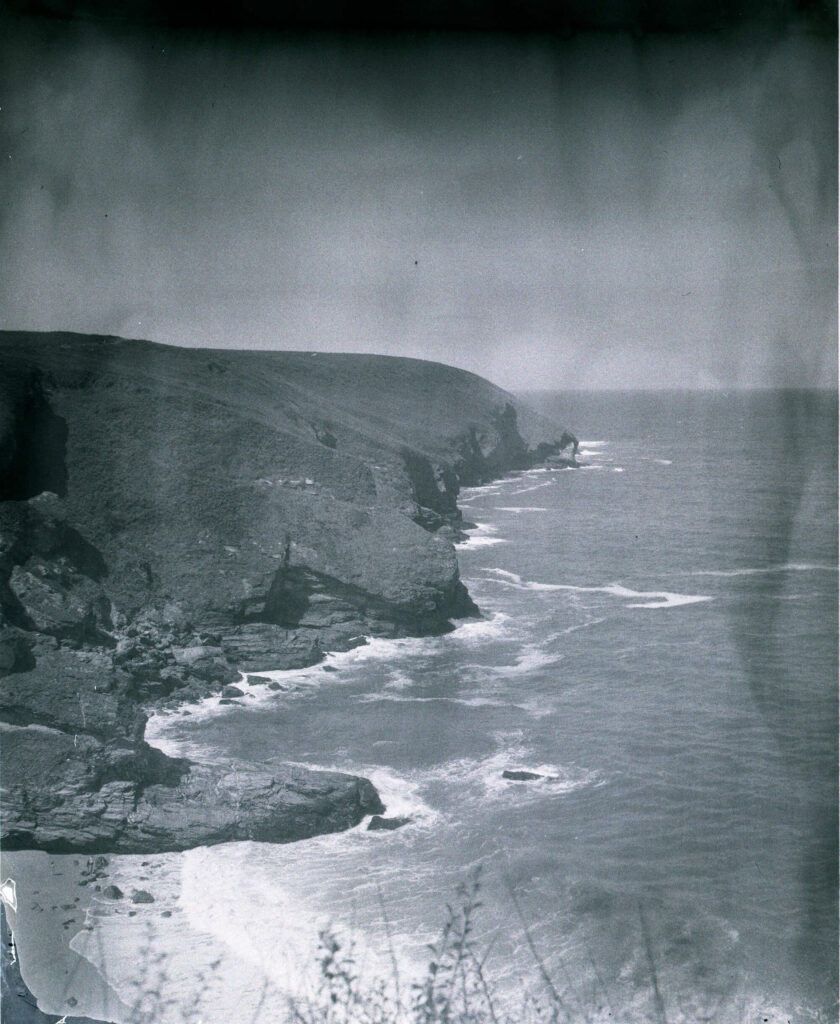
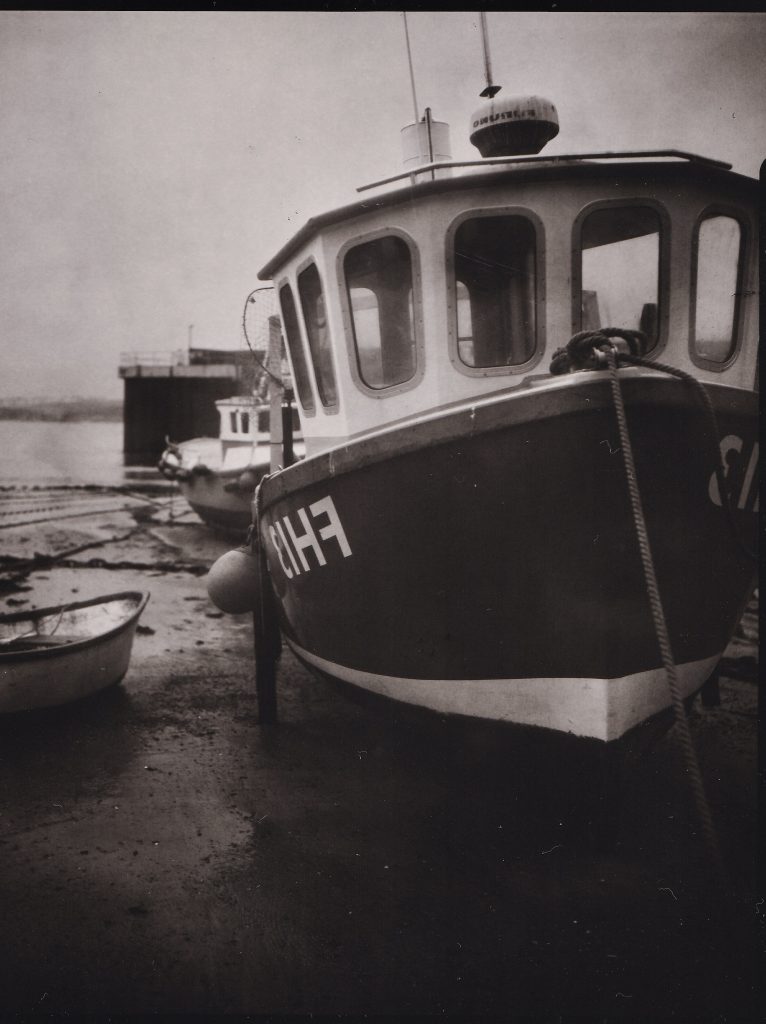
Combine your two solutions and use immediately. Unlike the chemical alternative, this developer has a much longer processing time. It will need to be in with the film for 60 minutes, inverting the tank every minute. I was not consistent with this and, as you can see from my scans, this resulted in quite a bit of bromide drag.
After an hour, drain and rinse for two minutes. Fix and rinse as normal. Others have used salt to fix their films but I like to work with one variable at a time when using new developing techniques.
My results can be seen below, I will definitely try this method of processing again, being more disciplined with the tank inversion and maintaining the temperature of the developer.

Developing Direct Positives with Caffenol
For me one of the great things about large is being able to shoot direct positives. As they are developed using the same chemistry as black and white film, most of the alternative developer recipes can be used on these too.
I had used caffenol to develop film after experimenting with seaweed. It uses 2 of the same ingredients, has a much faster development time, and seems a bit less temperamental.
As with seaweed I find that it less about the recipe itself and more about the method of developing. Caffenol has a very short shelf life, after about half an hour it isn’t going to be any good, so use it as soon as it is mixed. Keeping the solution around 30 degrees is also going to help a lot. Finally mixing; you need to create two solutions, one of sodium carbonate and vitamin C, and another of coffee. These should be combined just before you pour the developer into your tank/tray.
When it comes to coffee this is the only circumstance where cheapest is best. The ideal choice is the strongest, cheapest instant coffee you can find. The main reason for this is that you need a high concentration of caffeic acid which is easily broken down. Cheap coffee will contain more than a slower roasted, expensive alternative.


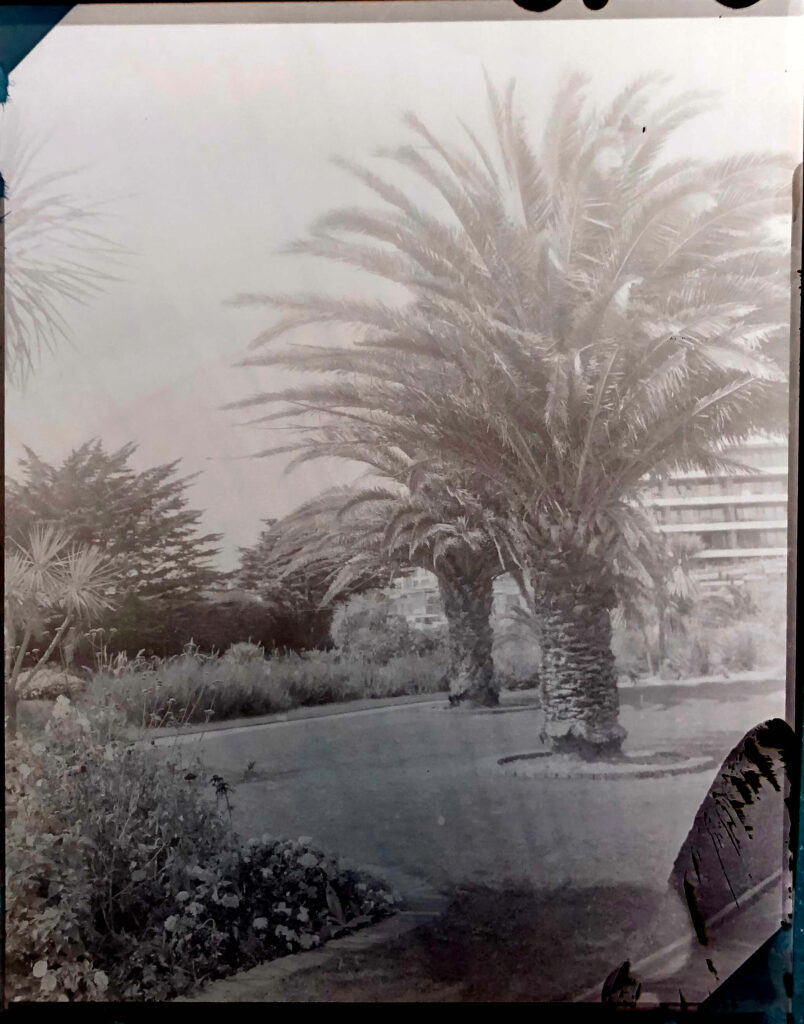
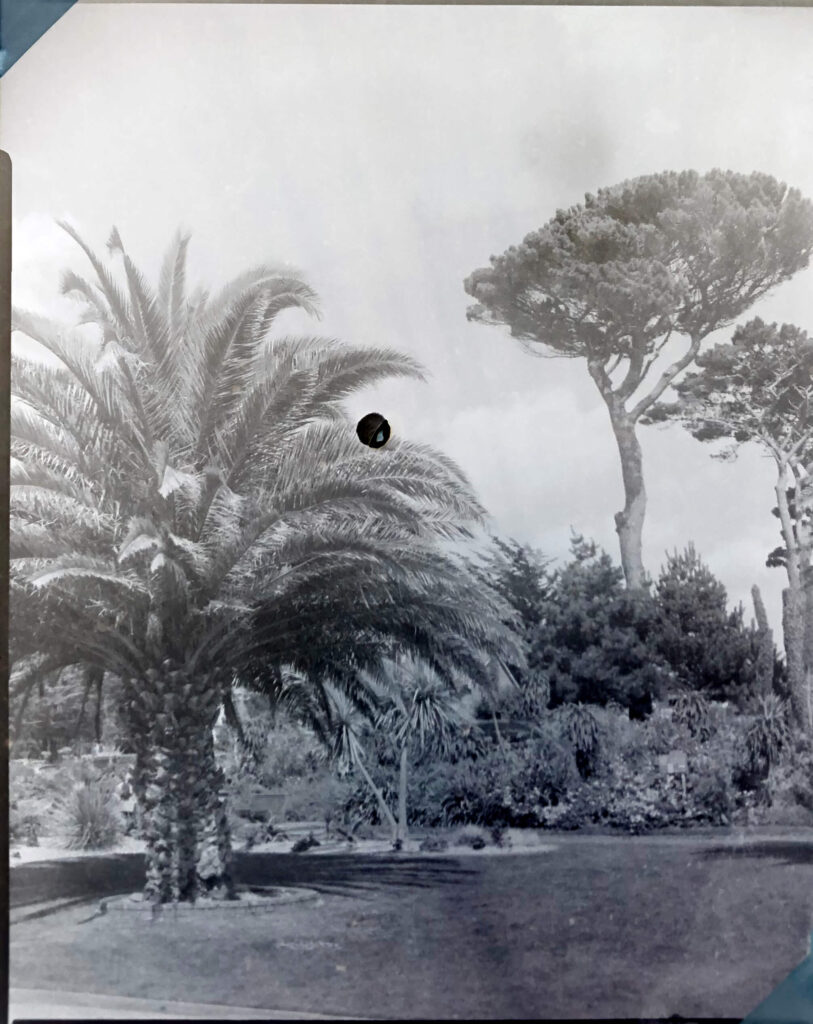
Coffee stains; there is no escaping it. As direct positive photos are paper based, the final results tend to have a wam sepia tone. The blacks tend to be chocolatey and the whites more creamy. This can be lessened by soaking your prints in running water for a few hours but that seems a bit wasteful. I have found that soaking in water for an hour seems to reduce the staining to an acceptable degree. Change the water a few times to get the best outcome. But it’s best to just lean into the look.
The recipe: In one container dissolve 9 teaspoons of instant coffee into 250ml of 30 degree water. In a separate container dissolve 6 teaspoons of sodium carbonate into another 250ml of water, add to this 1.5 teaspoons of vitamin C powder. Mix the two solutions right before use.
Direct positive paper needs 3 minutes developing time, agitating every 30 seconds. As the paper is quit sensitive it will need a stop bath for 10 seconds, followed by a 2 minute fix, and finally a rinse as explained previously.
To use Caffenol to develop film, the processing time will need to be extended to 9 minutes, agitating every 30 seconds. Complete with a wash, followed by a 2 minute fix, and final wash.
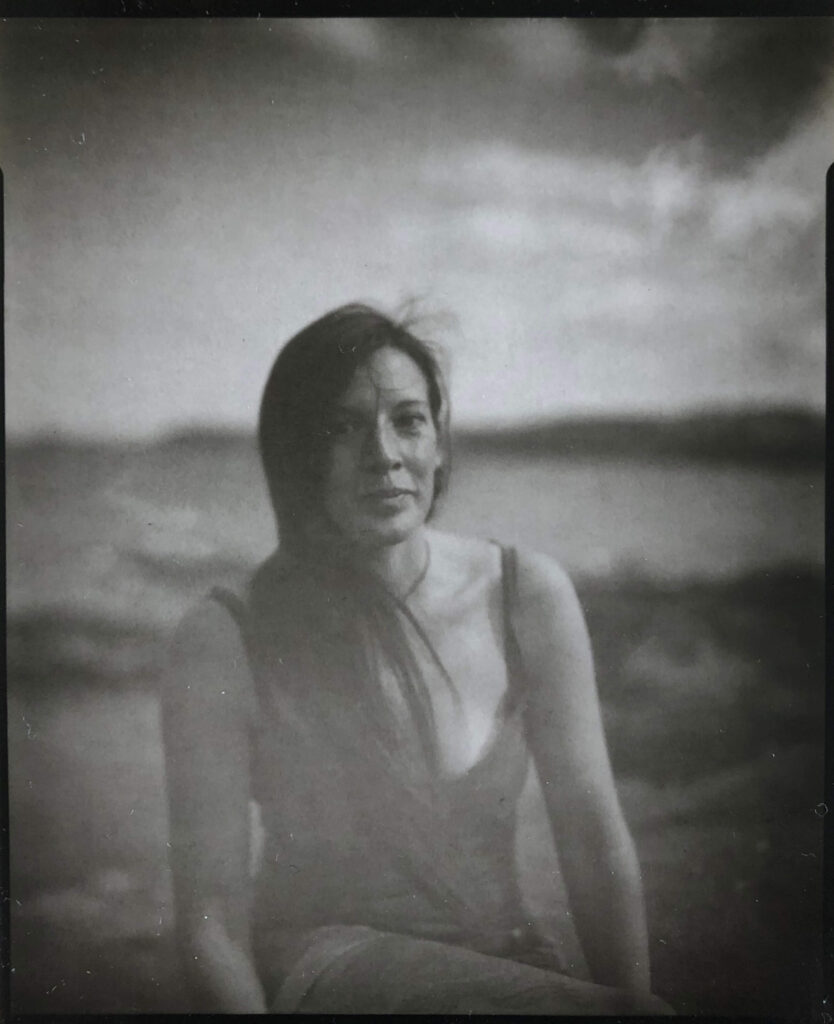
I love the effect you can get with caffenol; in fact these days, I tend to use it exclusively. See some results below.

Homemade Camera
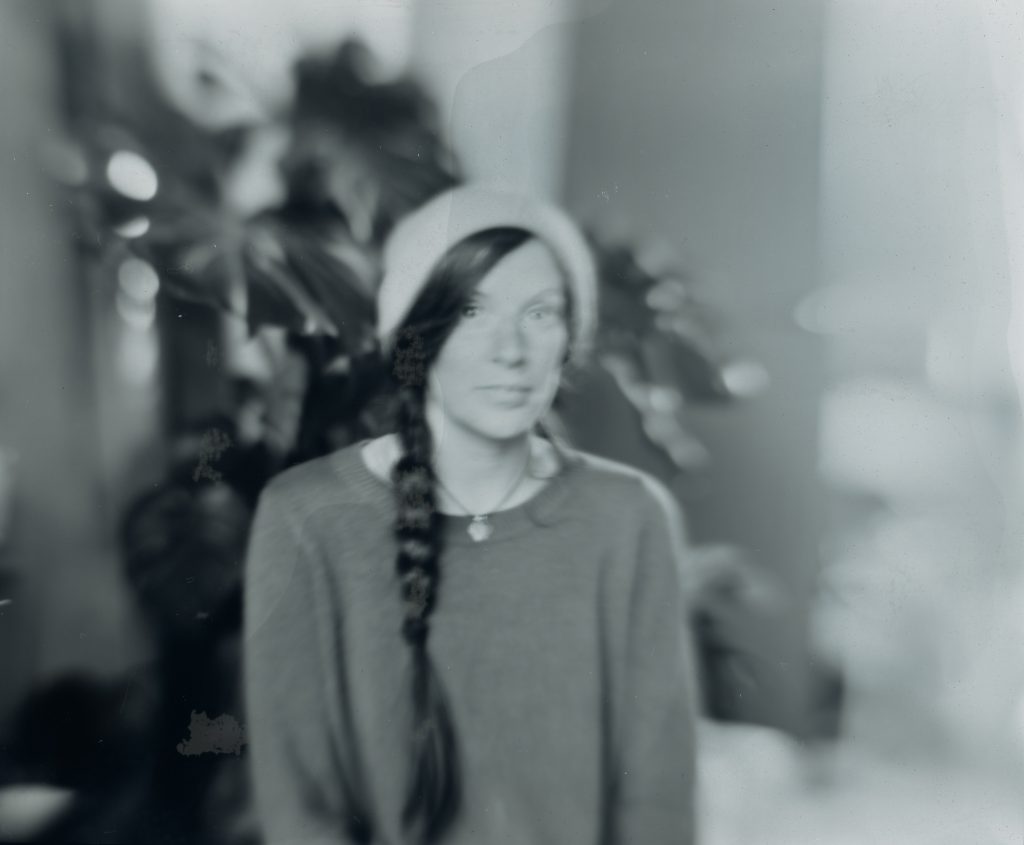
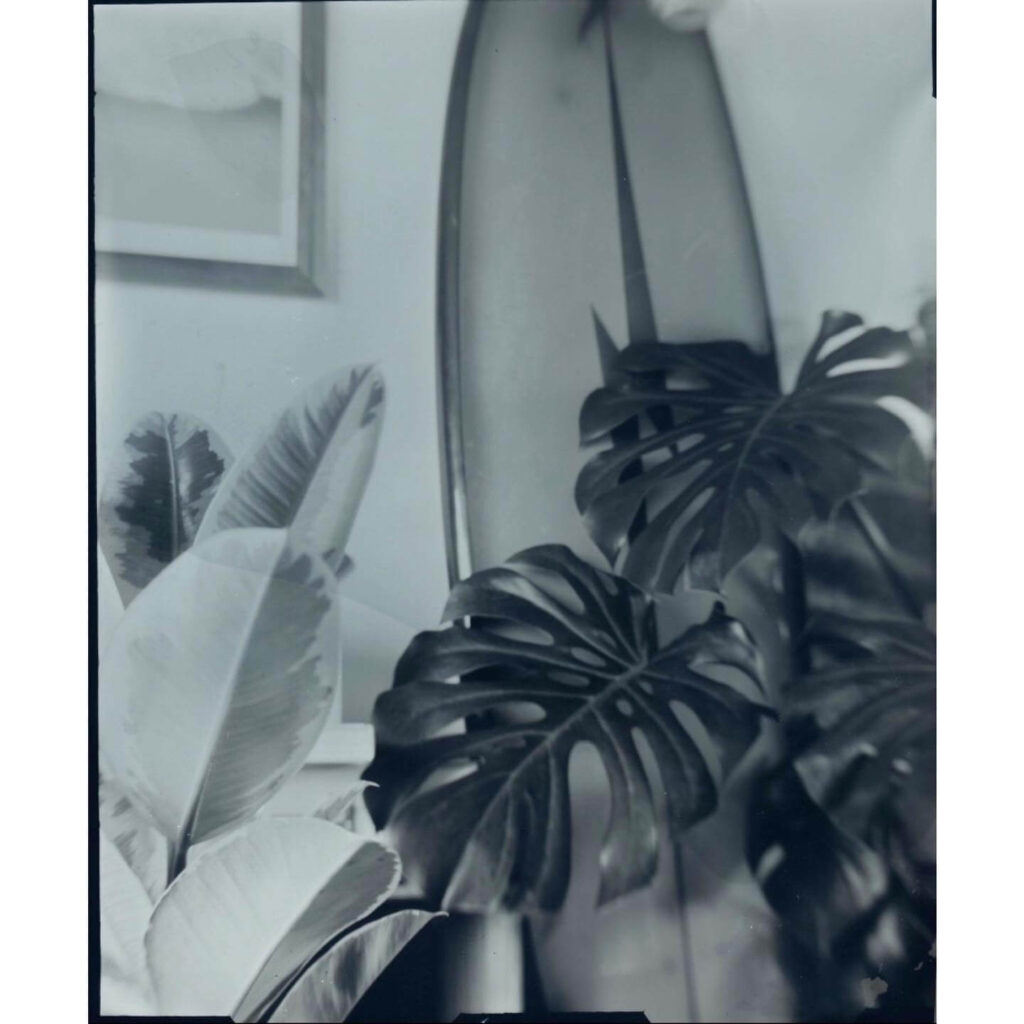
After experimenting with 4×5 direct positive photos I wanted to try something bigger. But 8×10 camera lenses are expensive and hard to come by so I started to look into pinhole cameras, which in turn led me to box cameras.
Brownies are the most well known, fixed lens box camera, so my initial idea was to do something between a Brownie and a pinhole, using a magnifying glass as the lens. As I started to experiment with how far the lens needed to be from the paper to cover the full 8×10 frame, I found that by moving it just a small distance you could change the focal range from the foreground to the distance. Now, rather than making a relatively simple box camera, the project morphed into constructing a camera capable of focusing.
There are a couple of ways to do this, the most simple being two boxes that slide in and out of each other.
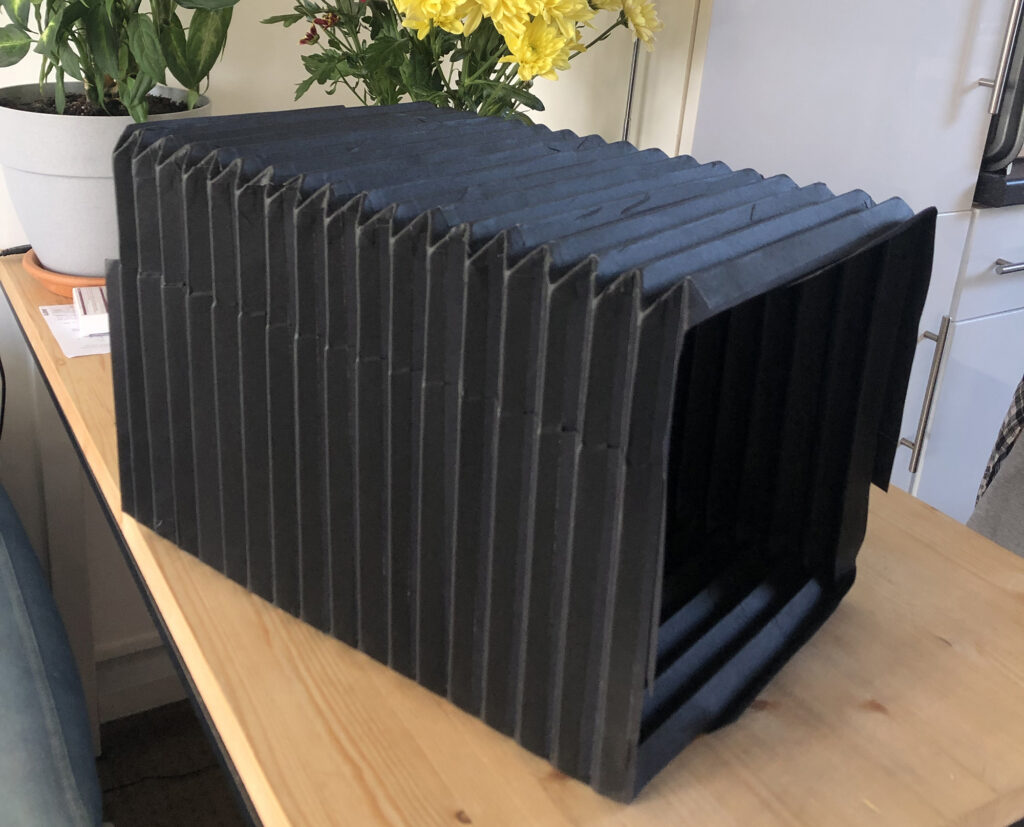
Option two was to create a bellows camera similar to the Intrepid I shoot 4×5 with. I decided to work on the latter, with the thought that it would probably be slightly easier to transport.
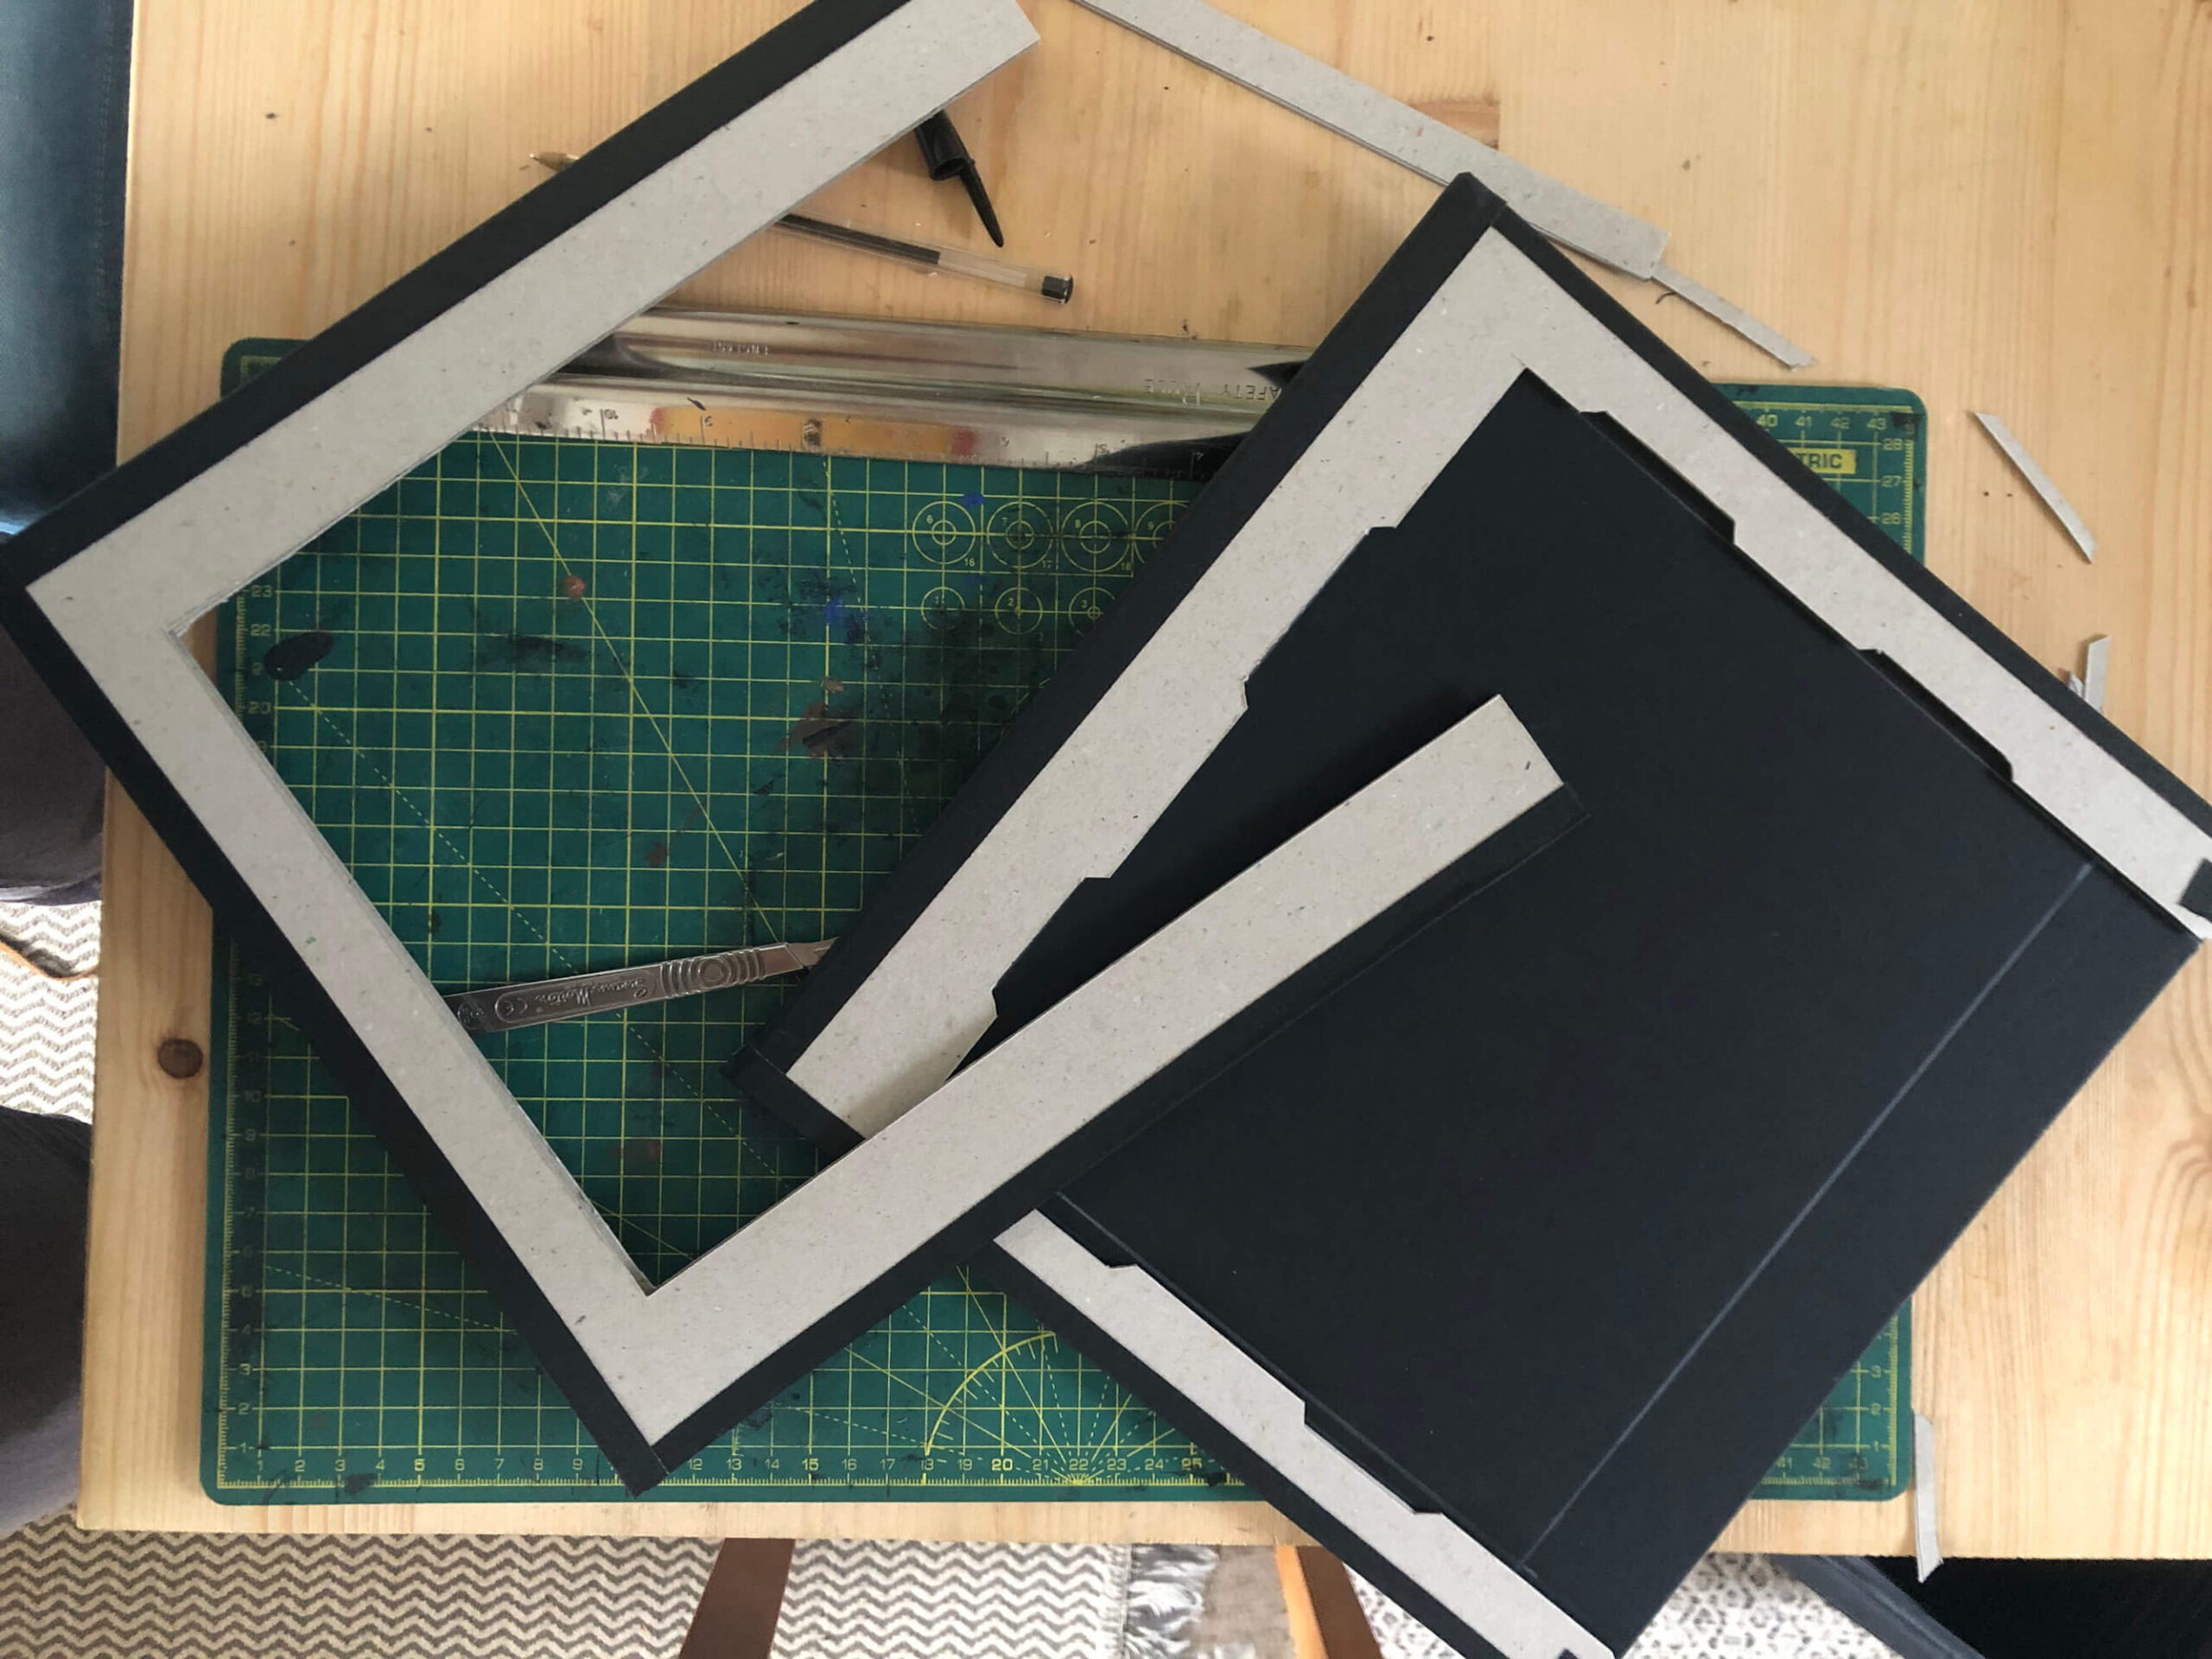
Creating the bellows out of one piece of card would be the ideal method, unfortunately due to the size of the camera I was unable to source card stock big enough. I settled on creating the four corners and overlapping the sides.
The card stock needs to be thick enough not to tear after repeated movement but not so thick as to crack when creased. Obviously matte black stock is best at not reflecting light.
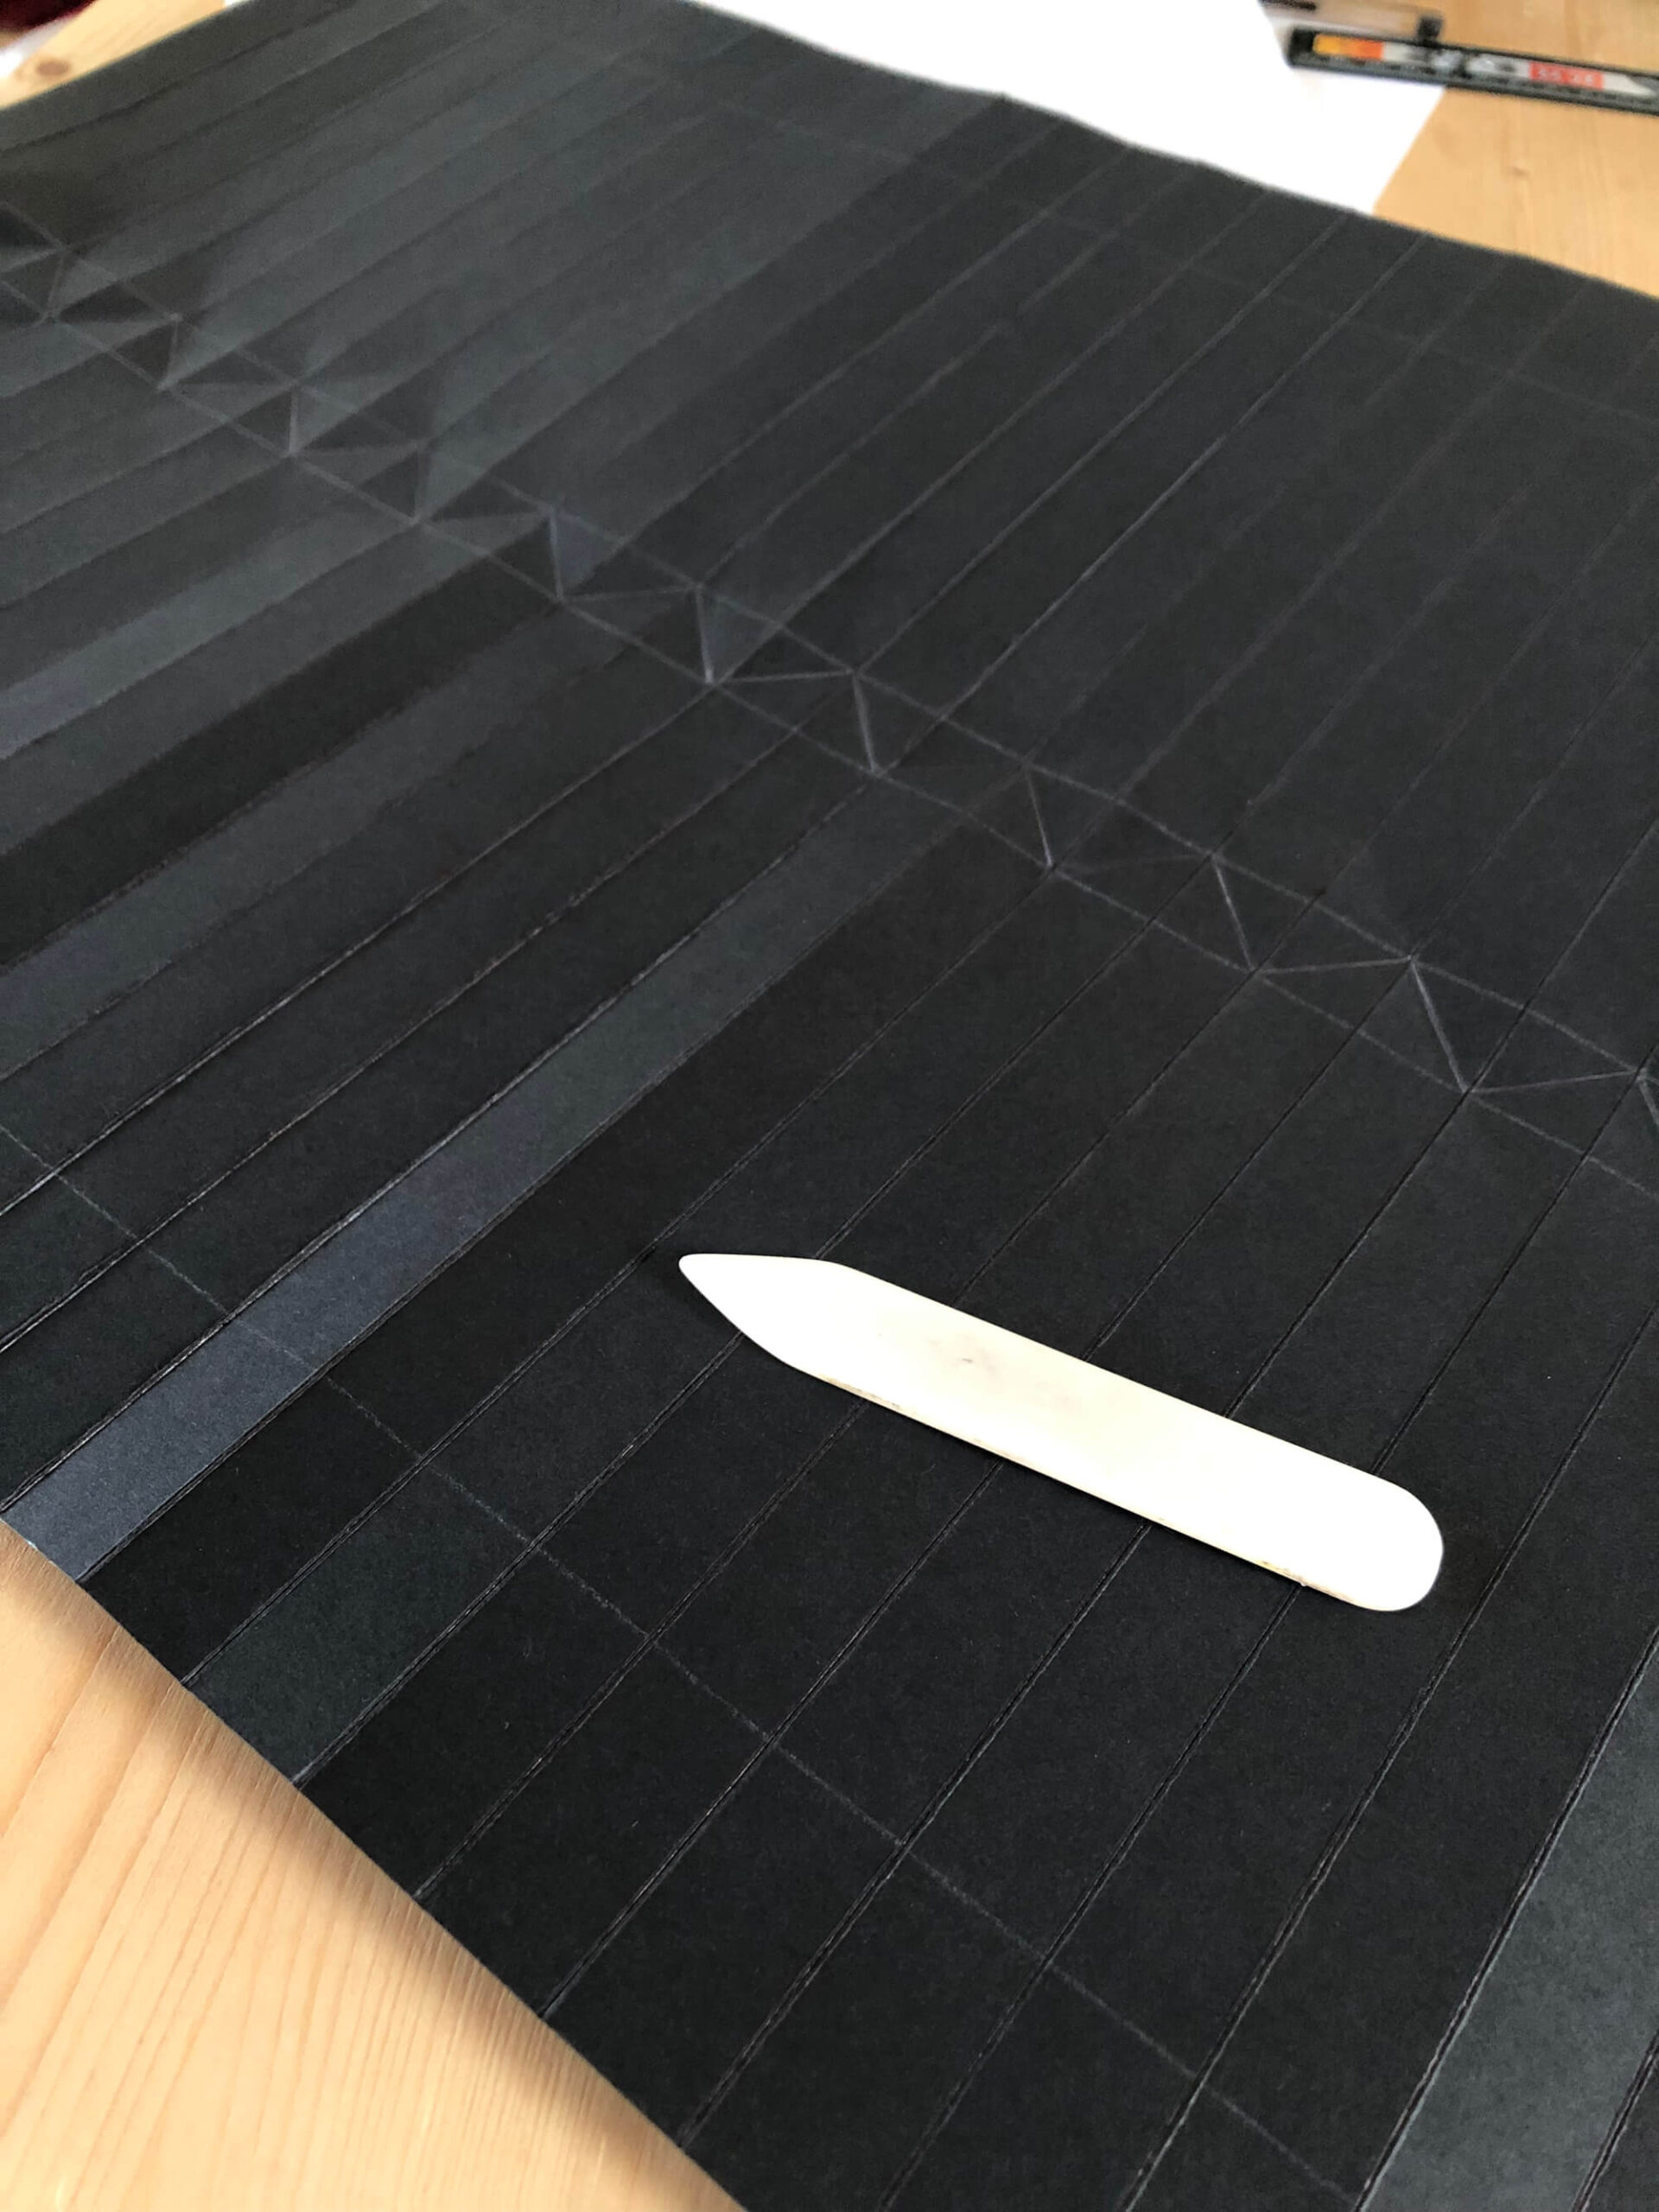
Don’t let the folding put you off, it’s actually reliably easy to create bellow corners. Below are a series of images showing how to crease and fold the corners.
The card needs to be divided into two with a gutter running down the middle 1.5cm thick. Lines then need to run the width of the card, each 1.5 cm apart. This should create a series of squares in the gutter, mark a diagonal line across them in a zigzag pattern.
Now to the folding. In the most basic terms, the left side of the card needs to have a concertina fold one way and the right side needs to concertina the other. So, if the left side is creased upwards, the right needs to be crease downward. I found it easiest to think of each fold as an arrow, the upwards creased arrow points towards a downwards crease.

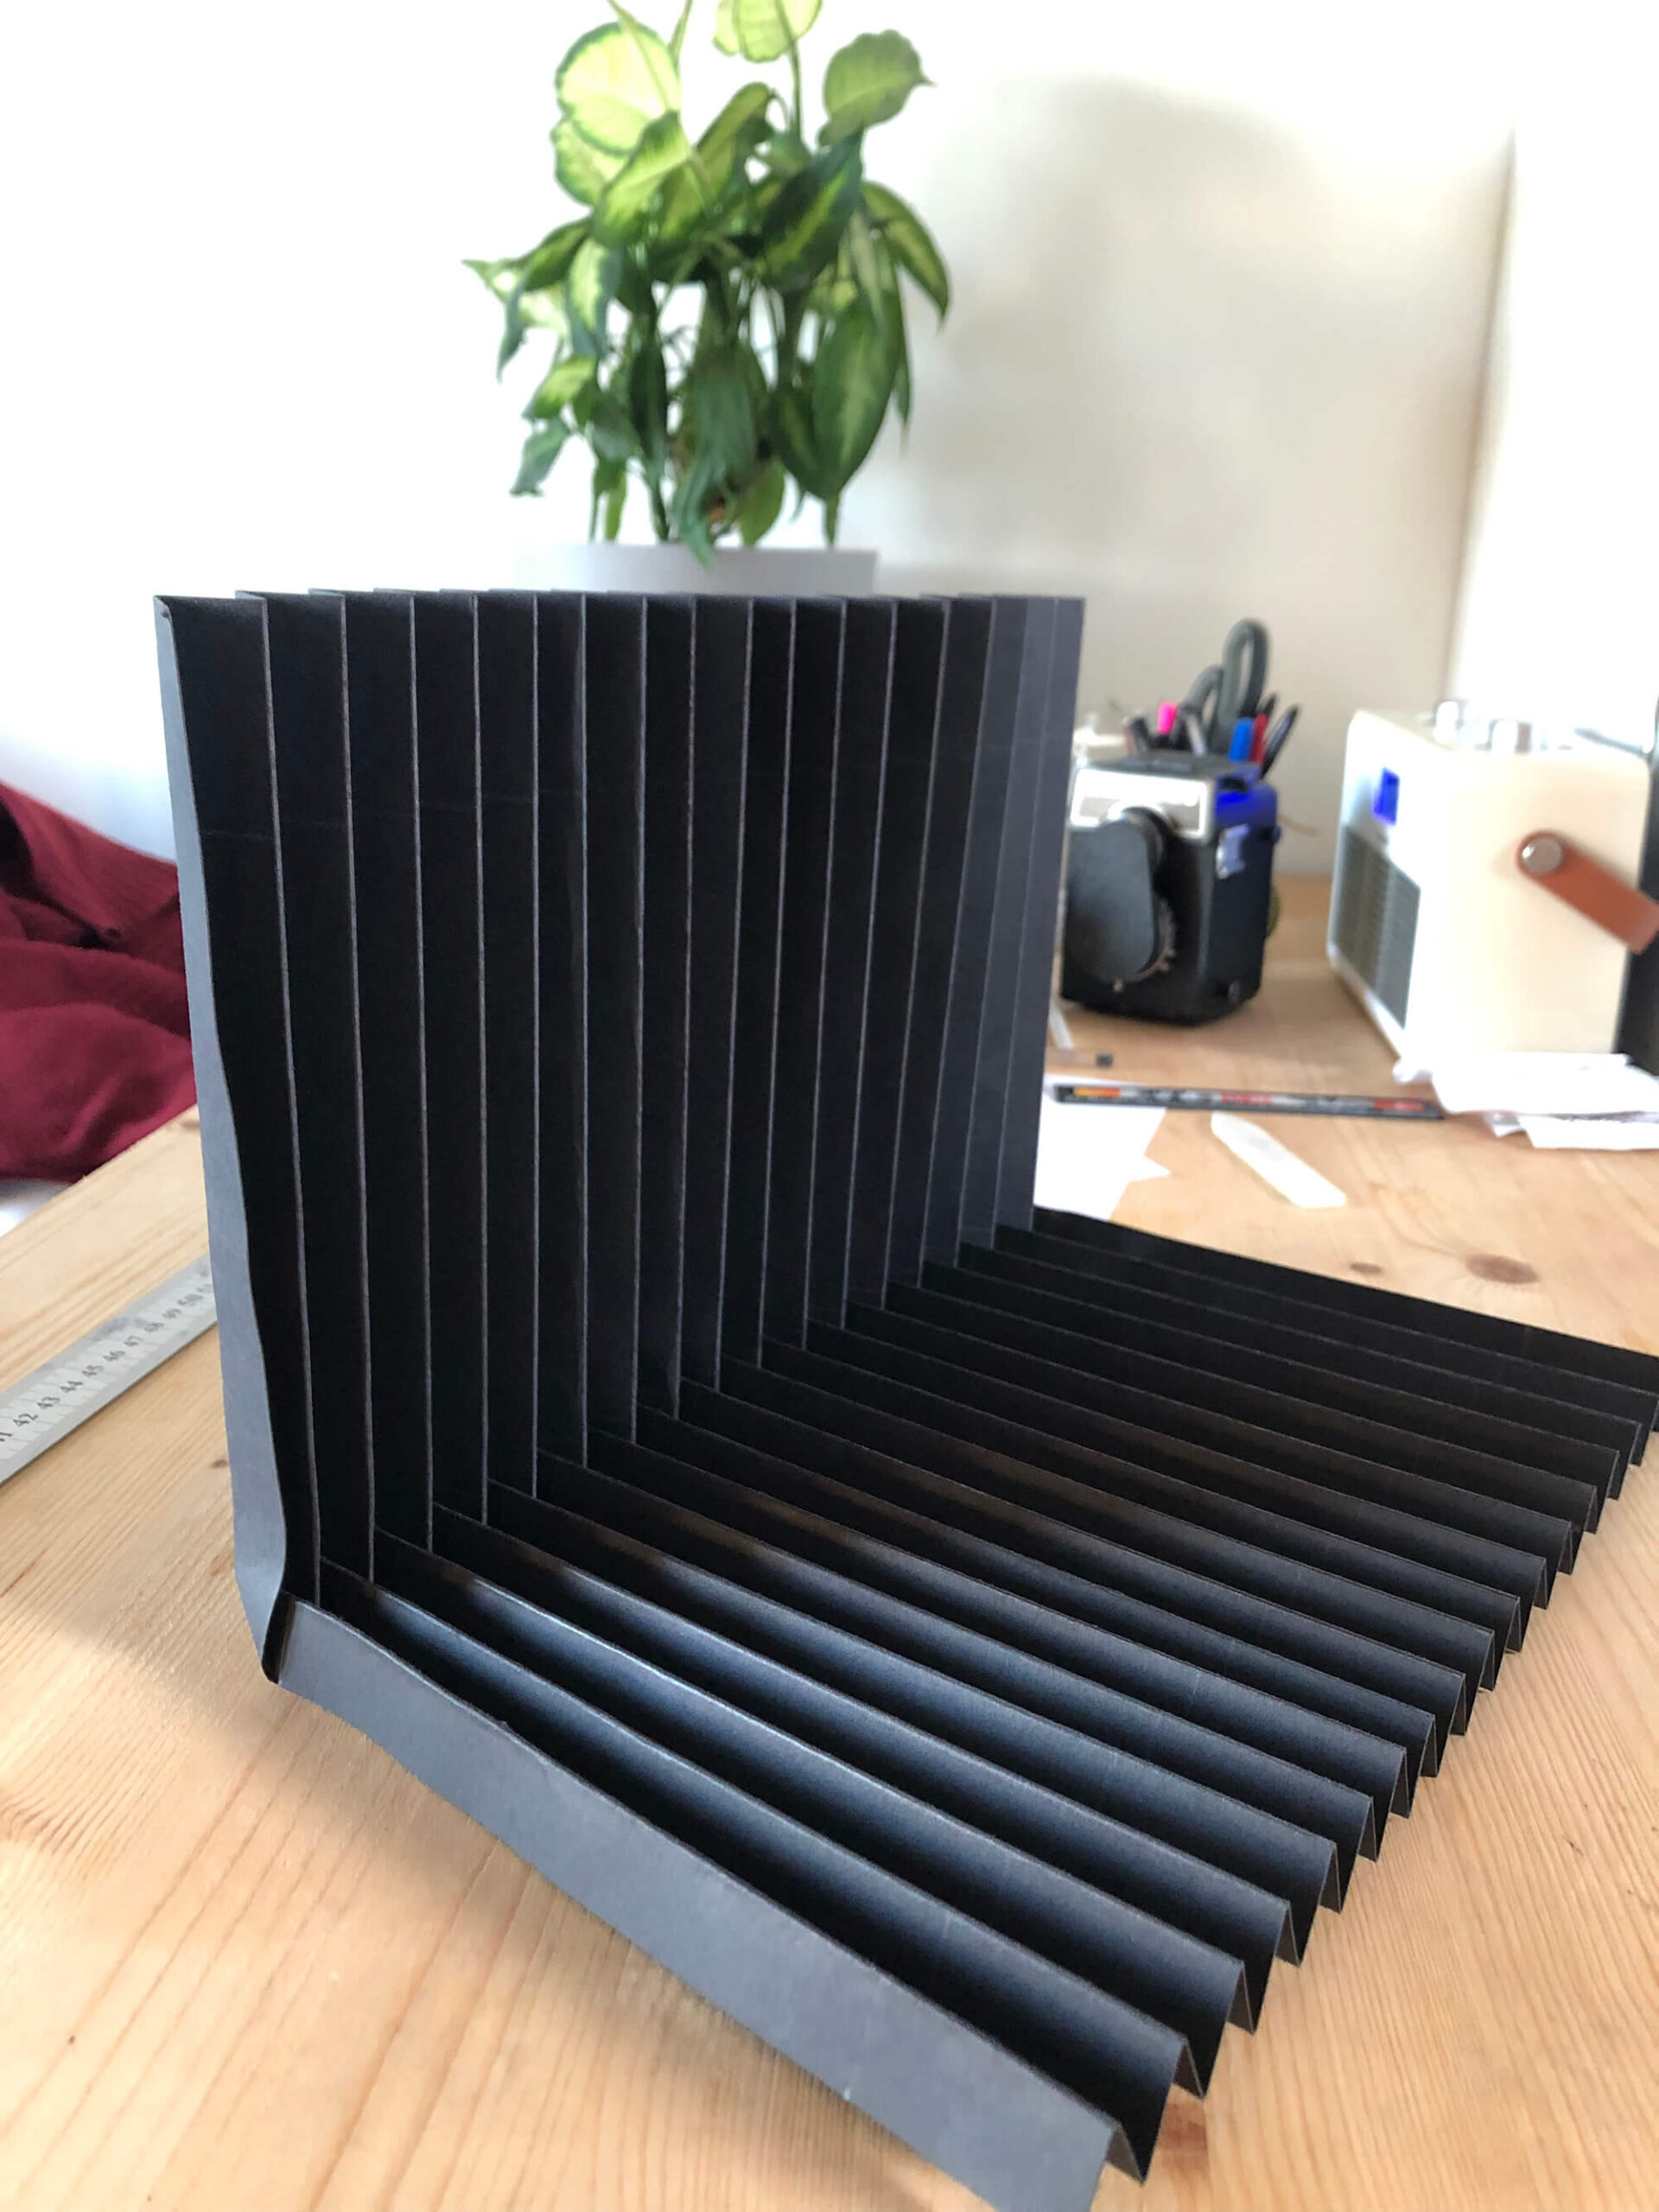

Once all four corners are complete they need to be stuck together with a generous overlap to keep the light out. I then covered the whole thing with gaffers tap (the matte black fabric stuff not the shiny plastic cheap alternative). The gaffers tape helps to keep the light out and stop any stress holes appearing.
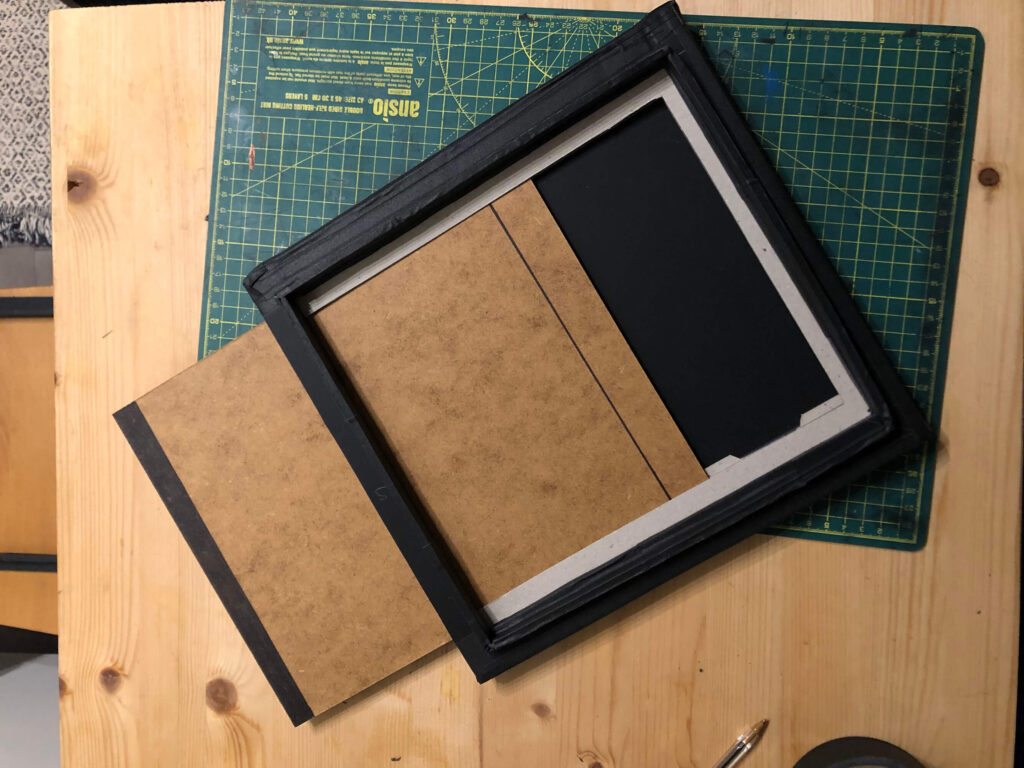
I created a frame out of a few layers of foamboard and gaffer these to the front and back of the bellows. The lens board and dark slide will be mounted to these.
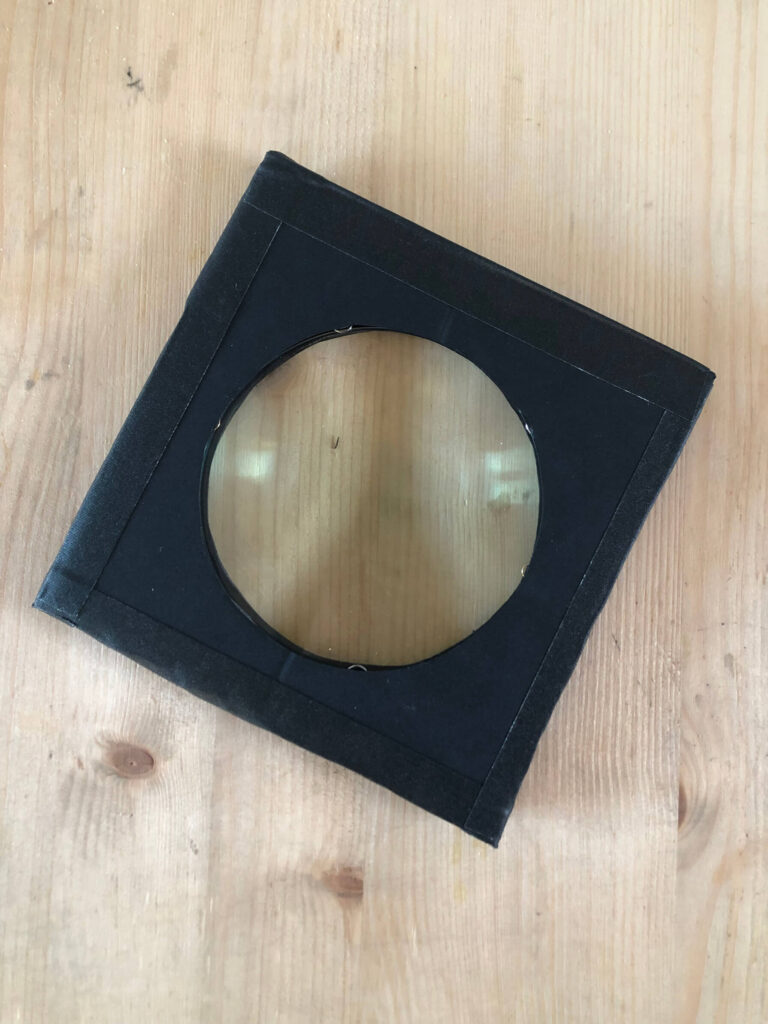
I wanted to be able to remove the lens, so I mounted the magnifying glass lens inside a foamboard square and created a separate lens board that is permanently fixed to the camera. The key with having anything removable on the camera is to ensure that both pieces have overlaps to prevent and light leaks. Images of this can be see below.
Now then lens is fitted we need a focusing window. Most large format camera use ground glass, but that was a little too expensive and heavy for a camera made from card and gaffers tape. Tracing paper is a great alternative. I stretched some over a foamboard frame with a flange to slot into the back of the camera.
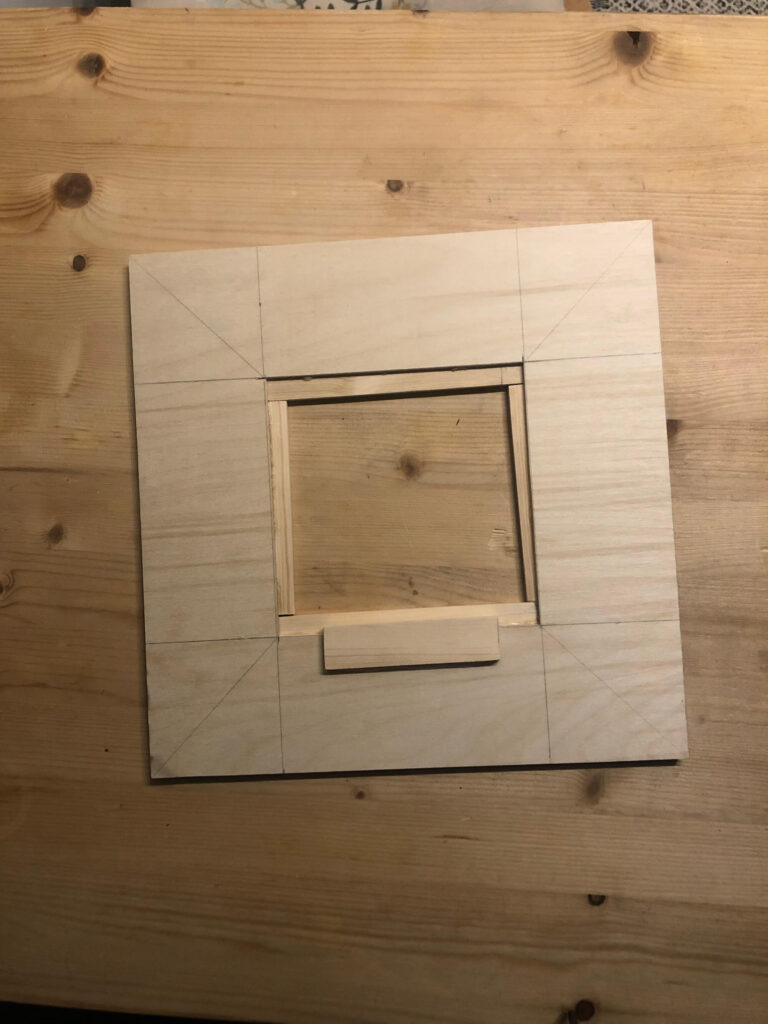
Wooden blocks were then mounted to the front and back of the camera. A long bolt could then slot through these and into the wooden base of the camera. This was made from a length of wood, at one end was a single hole that the front bolt can secure into. Running up the centre was a long slit that would allow the back bolt to move back and forth to focus the image. It is then secured in to the desired position with a wing nut.

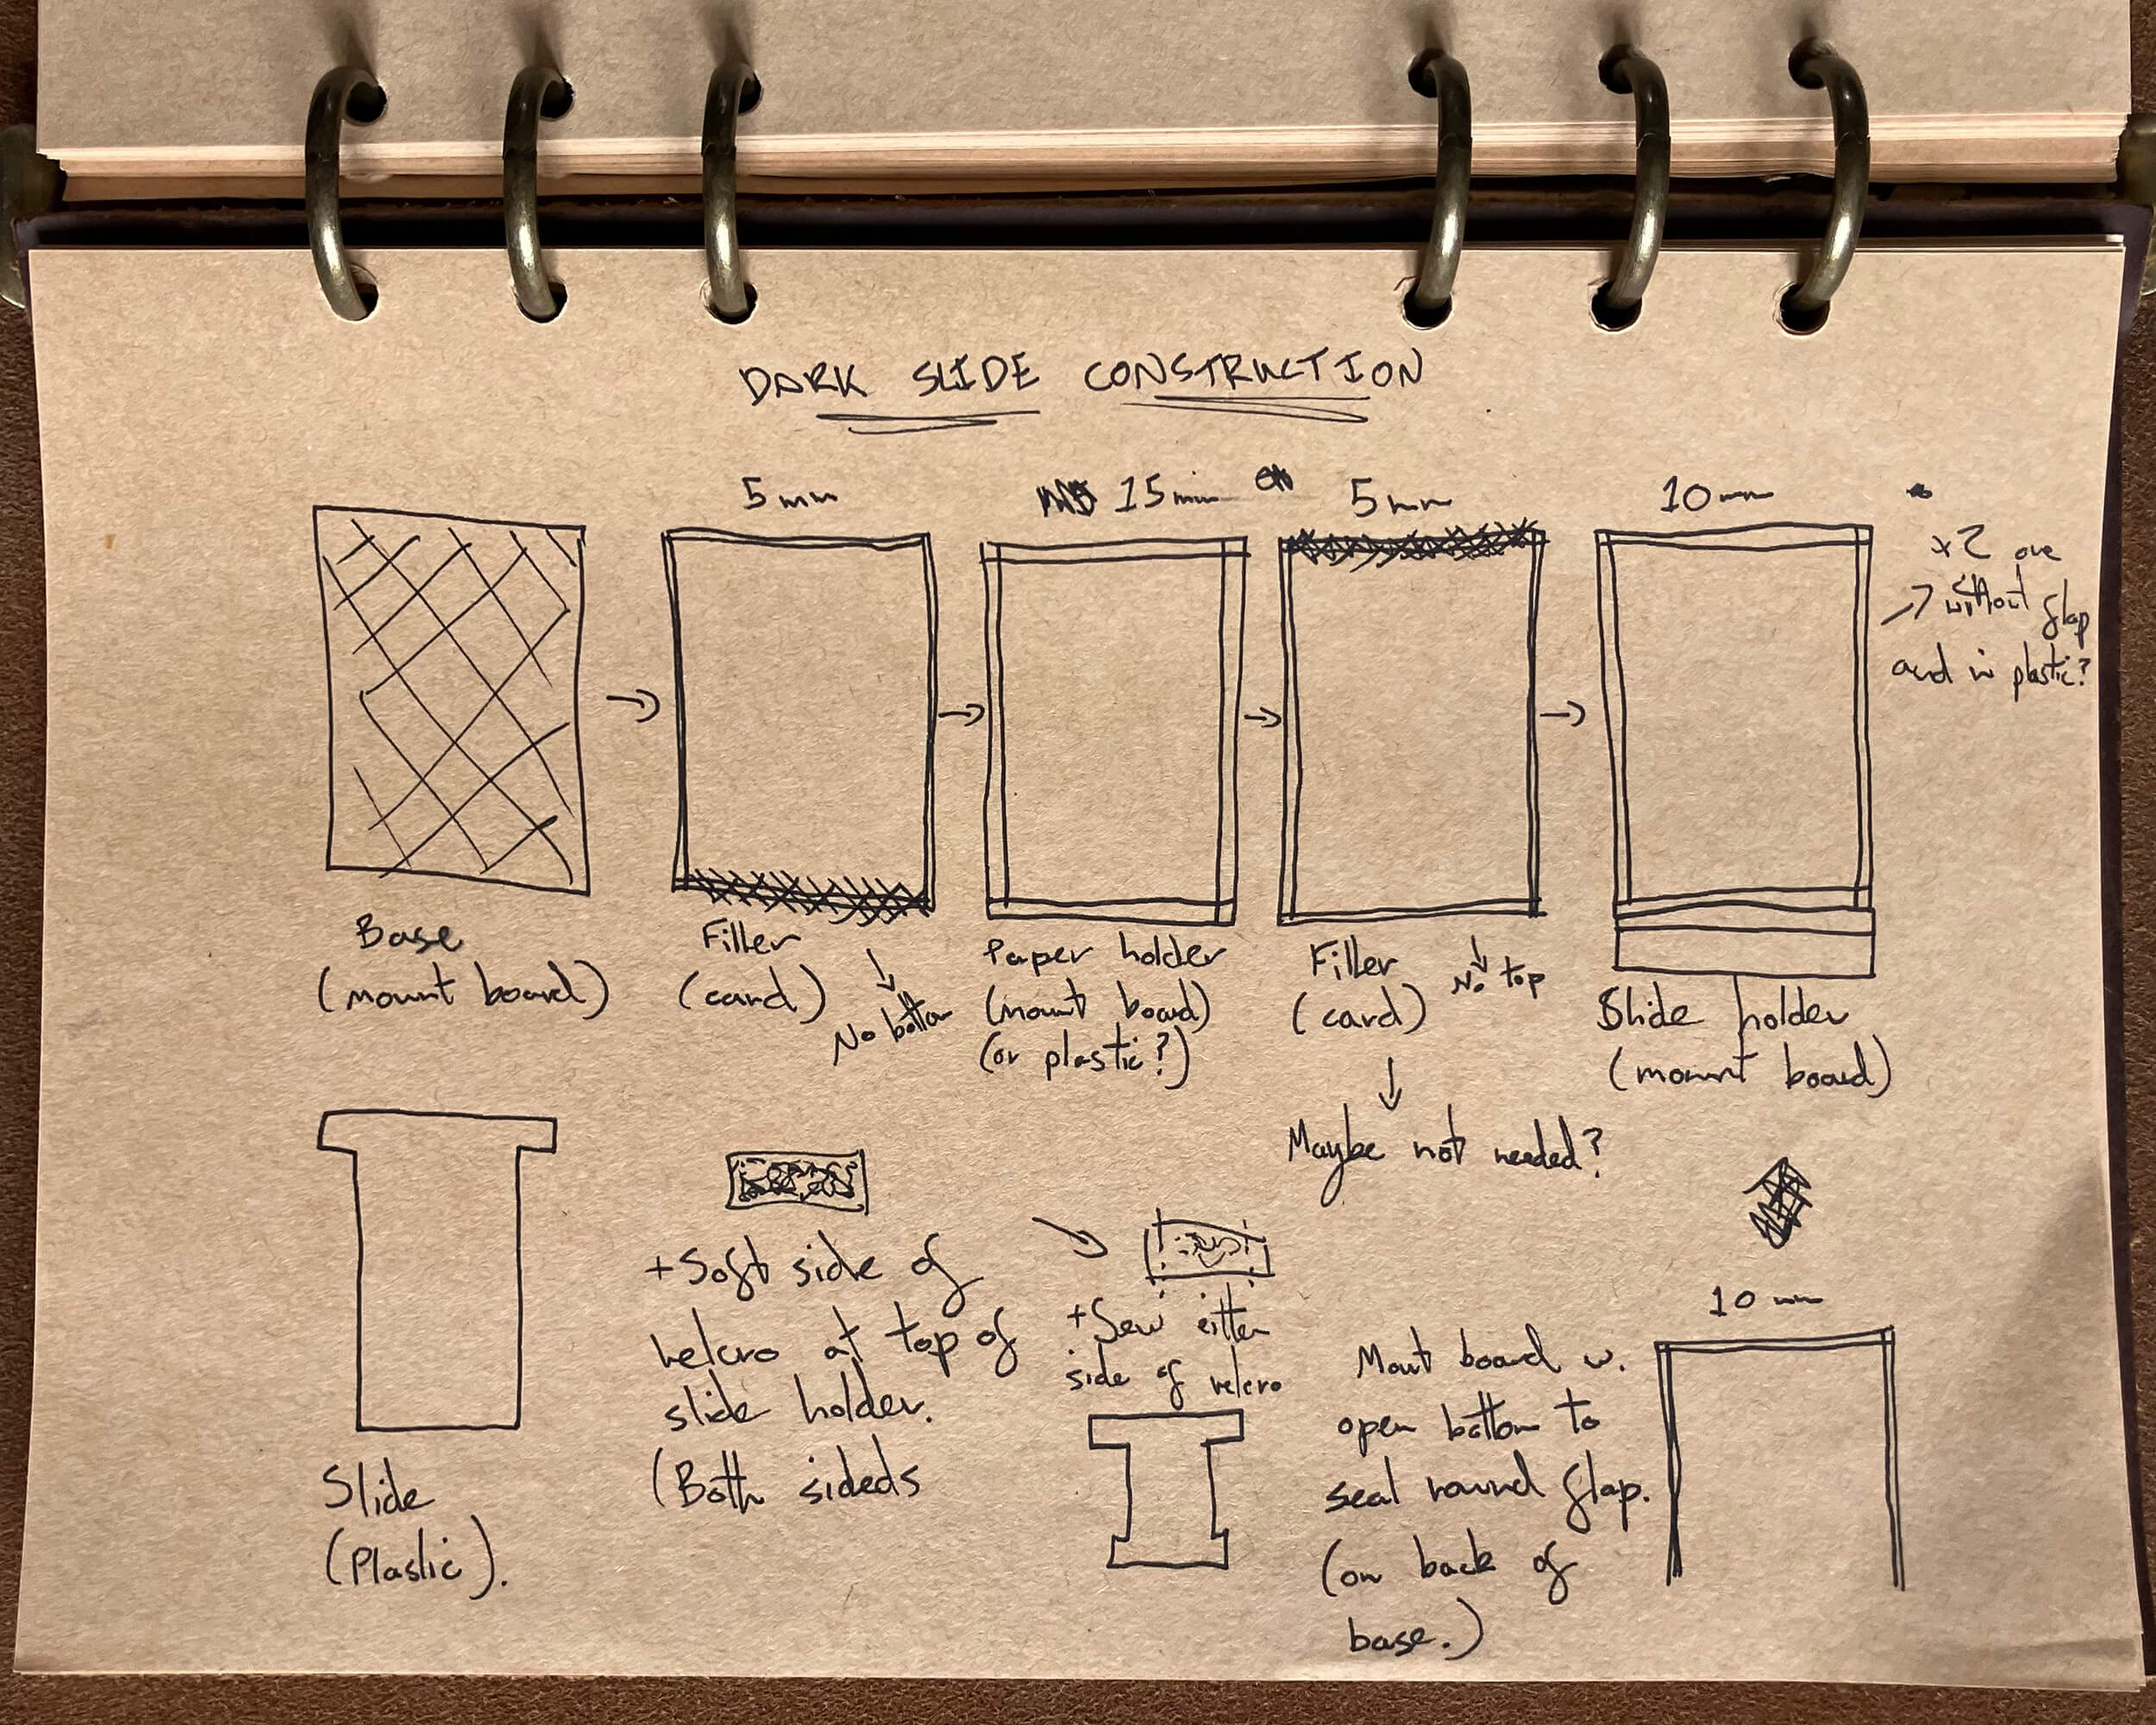
Of the whole project, the dark slide was probably the hardest to plan. As it holds the light sensitive paper, the key is to ensure a light-leak-free environment.
My notes here show the basic structure;
- A side opening to insert the paper, held flush against the backing by a frame with a velcro strip as the closing mechanism.
- A top opening, lined with the fluffy side of velcro to act as a light guard, where the dark slide is raised and lowered.
As there is no iris on the magnifying lens to limit the amount of light, I created some by cutting various sized holes in pieces of black card. The F stop can be determined by dividing the distance the bellows are extended by the diameter of the hole. For example 300mm (extension) ÷ 17 (hole diameter = 17.6 round this up to an F stop of 18 and light meter accordingly.
The complete camera works surprisingly well, I shot paper negatives, as a cheap way to test the camera. Take a look at a few of the resulting shots below.